
Garden Process And Reveal [Part One]
[Ad: I worked with Otto Tiles, J Adams & Co, John Lewis, Heal’s and Corston Architectural to make our garden beautiful.]
Yes yes, I know. We started our mega garden makeover way, way back in April last year, and it’s been ‘finished’ since September. So why haven’t I written about it here sooner?
Well the truth is, it’s not actually 100% finished, and I really wanted to show you the entire thing rather than splitting it up into more than one reveal, but I realise this is silly self-imposed nonsense, and by my own admission, I don’t actually believe anything is really truly ‘finished’ anyway. So why wait?

The (summer) view from the kitchen
The next push will happen in spring, and it’s largely the front patio area that needs the most work - grouting to finish, more planting required, and painting of the side of the house too. I thought we might get this done in September, but once we came up for air, the rain started and didn’t really stop for six weeks and then suddenly it was winter, Christmas was hurtling our way at an alarming rate, no one knew if they were coming or going (literally!), and now, here we are, back / still in lockdown, still living in a very different world. A world where I suspect we’ll be spending another summer at home using the garden perhaps even more than anticipated. But boy do I feel grateful to have it.
That said, I’m really looking forward to getting stuck back in when Spring arrives, and sharing part two with you then, and for now, I’m thrilled to finally show you all our (mostly Ed’s!) hard work from last year so far.
If you want the full run down of our plans, you can look at my initial blog post here.
Before I go on, I need to acknowledge Ed’s insanely hard work. He is my real life super hero, and probably did more than ninety percent of this project himself. I mostly made tea and bossed him around.


So what did ‘we’ achieve? LOADS!

An unusually tame and tidy shot of the back section of the garden on the day we decided to go for it.
Ed singlehandedly cleared the back section of the garden of literally tonnes and tonnes of soil, rubble and ivy, to level the area for a patio, and created a slightly raised patio base, utilising some saved rubble, and several tonnes of MOT sub-base, that was whacker plated down for a level base. He also built a garden bed across the full width.

The shameful ‘before’ looking back at the house from what is now the middle grassed section. OMG!
Much the same was repeated for the front patio and side return area off the kitchen and dining rooms, but not before having to dig down and removing another few tonnes of dirt so that when it was built back up it would still be below the damp course. He built a retaining wall and a single step which leads to the grassed middle section, and a long garden bed that runs all the full length of the side return to the french doors leading to our dining room.

He rendered all this brick work, and the two walls made from breeze blocks next to the back patio. We have a patchwork of six different fences / walls enclosing our garden, and there’s not a huge amount we can do about it that wouldn’t cost a fortune, so I decided to embrace what I couldn’t change. I used a watered down lime render to experiment with a kind of render slurry on a small brick wall just to the left of the kitchen doors, but I’ll tell you more about that in the second instalment once spring has sprung. Although it was neither particularly successful, nor unsuccessful to be honest, so don’t get too excited. Ha!


All this took months, as he was not only a one man band for all the hard labour, but was also working full time from home too. No rest for the wicked, but he did see it as a welcome distraction for the madness going on in the world around us.
At points I honestly thought it would never end, and questioned why we ever started. A lot.

Pretty sure this was the point where both of us were questioning our sanity in taking this on.

Patio bases finished, garden beds built, ready for tiling.
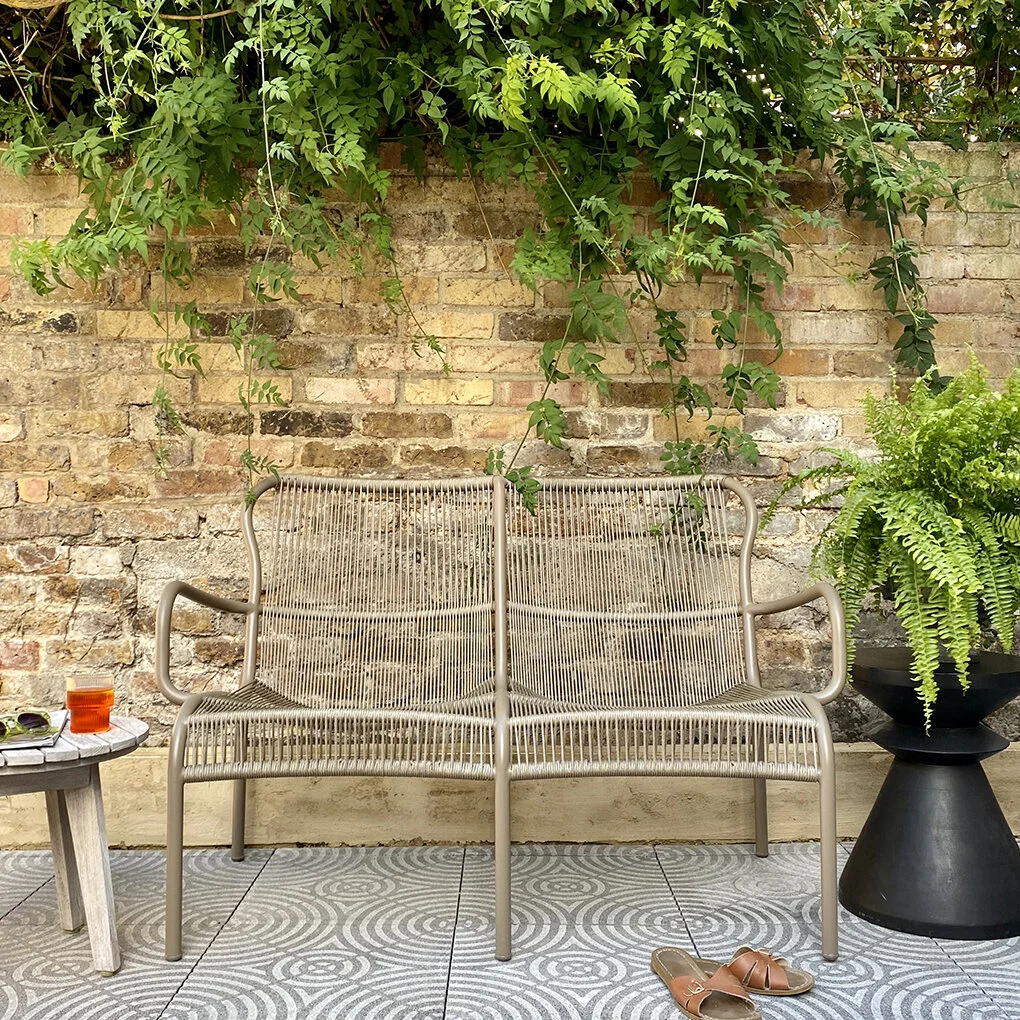
The day we were ready to start laying the incredible ‘Pavia’ outdoor terrazzo tiles from Otto Tiles, that undoubtedly set the tone for the entire space was a real turning point, and from that time, it really started coming together, and the stress started to melt away, as my vision finally started to materialise. True story.

The first tiles going in. This was a good day!
The mesmerising concentric circle pattern of the terrazzo is timeless yet contemporary and I love that they are unexpected and exciting but they don’t shout. Rather they are a brilliant base and everything just looks beautiful when placed upon them.


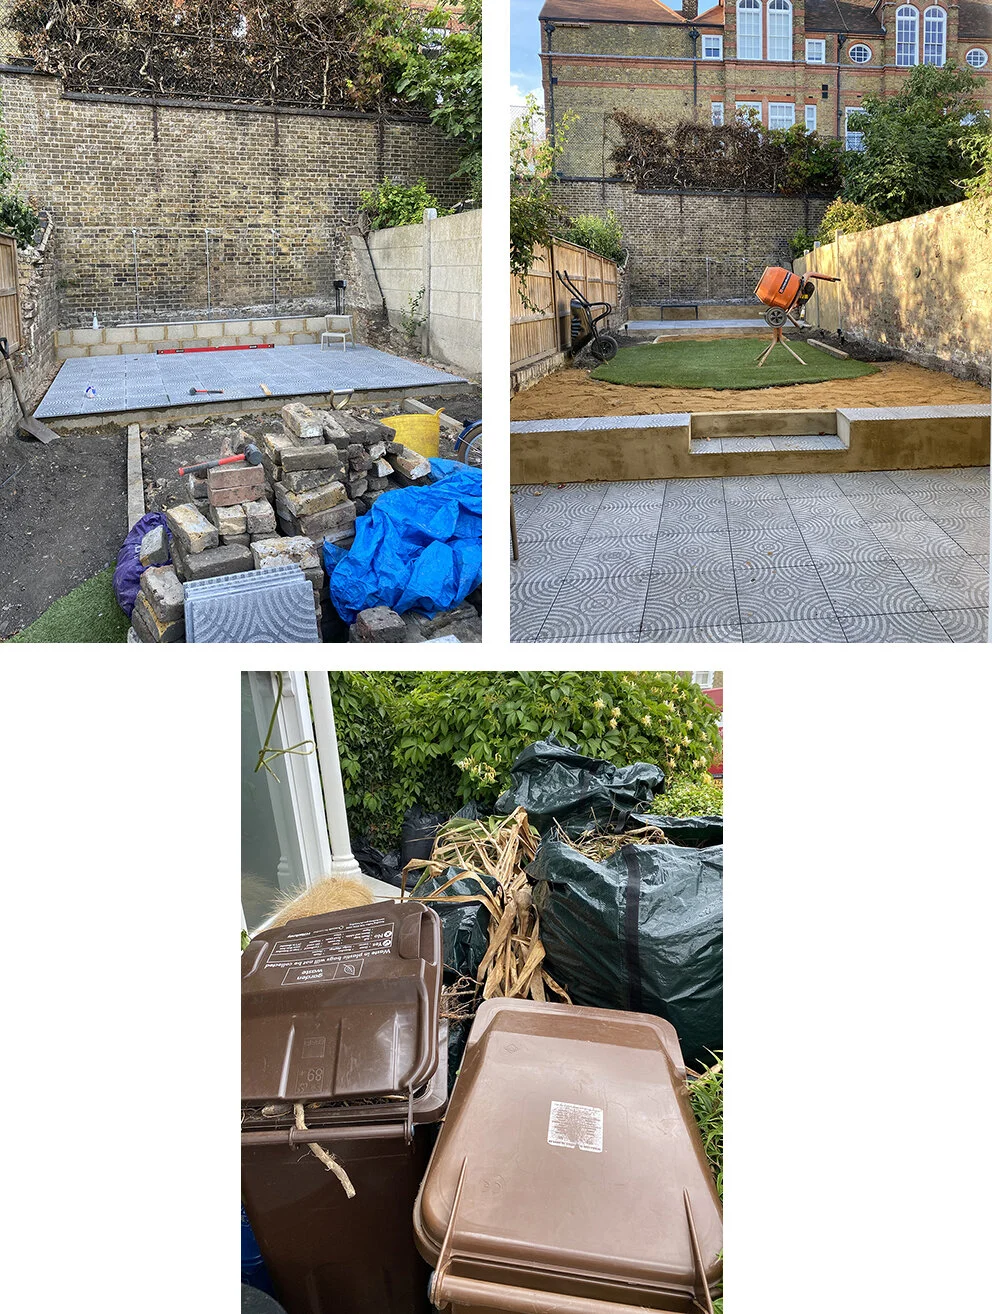
The tiling was finally complete and we were nearing completion, but the front of the house remained a complete mess for quite some time!
The other game-changer is the lighting. Not something we’d originally even thought about, it thankfully occurred to us that we’d be missing a trick if we didn’t put lights in. THANK GOD. There was no existing lighting at all, so my brilliant electricians came to lay the cables before any of the patio bases went down. Taking a feed from inside, we decided on four different circuits so we could isolate each areas lighting if we wanted to. To be honest we have all of them on every night, but you never know when this might come in handy.

We have one down light either side of the front patio (these are cheap basic ones from Amazon and and I may replace them one day), four stake lights in the side return garden bed (could have done with a few more I now realise, but it will do), three spike lights on either side of the grassed section in the garden beds, and then the piece de resistance - the undeniably stunnnnnning Ash wall lights by J Adams & Co along the back wall. They light up the one hundred and forty year old wall so beautifully, and are an absolute joy to sit beneath on a balmy summer evening. We adore them.

I sprayed the silver conduit black before the lights were installed.

My fabulous and dedicated electricians installing the J.Adams & Co. Ash Lights. In the rain.
We obviously couldn’t chase the cables into the raw brick, so I got my electricians to install metal conduit for the wires. I then sprayed it with matt black BBQ paint (primed first with an etching primer), and it looks brilliant. You can get conduit in black, but according to my electrician it’s not very good and rusts, so I went the tricky route instead, which kind of sums up every project I ever do. Le sigh.
Even in the depths of winter, looking out at the lit up garden makes my heart so happy. So whatever you do, do not under estimate the power of garden lighting.

They’re controlled by a remote switch (saving more drilling through external walls and chasing in wires, which is brilliant. Oh and we also had an outside socket installed up the back. I know one day I’m going to be happy I did and it will come in super handy - perhaps for festoon lights over the pergola that will eventually be installed.
Something I’ve not shown you installed yet for various tedious reasons (like not being able to get my hands on matching escutcheons to replace the existing ones for MONTHS on end), are the beautiful bronze handles that have replaced the previously hideous ones. The Harper door handles are from Corston Architctural, and we have them on both sets of doors leading to the garden. Of course I now wish I had them on all our internal doors too as they really are super stunning and the quality is amazing. I honestly don’t know why we had never replaced the old ugly handles as the difference is huge and they have really given the doors a new lease of life. Corston do the most beautiful range of hardware, switches and sockets, so do check them out if you haven’t already. I will of course show you the handles in situ when the front patio is complete.

OUR AWFUL OLD DOOR HANDLES WHICH HAVE NOW BEEN REPLACED WITH BEAUTIFUL BRONZE ONES FROM CORSTON ARCHITECTURAL DETAIL.
When designing the space, and choosing furniture, I made sure that the sofas and table would fit in any of the three spaces - so there would be plenty of room for them on either patio or the grass area. I have visions of lovely long lunches and dinners out there with friends in the summer, I really hope that we’re able to do that. My idea was always to have the table on the back patio, but actually so far we’ve only had it on the front one, but I plan to swap things around just as soon as it warms up.


I love the more traditional shape of our John Lewis Hoxton sofas for our garden. They make for such an inviting spot to sit and read, drink my tea in the mornings (which I absolutely did until it was too cold to be pleasant!), and to sit and chat and drink cocktails in the evenings. We did a lot of that whilst the weather lasted too! We even enjoyed what became the ritual of taking the cushions outside every morning and bringing them back in at night. I can ‘t wait to get them out of their winter resting place again and to spend balmy evenings lounging out there again. (These are currently out of stock by there are some similar ones available here.)

The Burford dining table and Miami dining benches, are also great, even if we didn’t get to enjoy as many meals out there as we’d have liked before the weather turned - rest assured they’ll be heavily used this year! Although it’s officially a six seat table and the benches are each three seats, we could easily fit eight or even ten around it if necessary with the addition of a chair at either end. Hopefully we will able to test this theory in summer.
We also have a gorgeous two seater Loop sofa from Heal’s that we have currently positioned in a super sunny spot against an old brick wall, it’s brilliant because it’s super light (yet super sturdy) and easy to move - into the sun for Ed, and into the shade for me!
I’ve never been a gardener, I’ve just never had any interest other than wanting it to look nice, so deciding what planting to get was a bit of a headache. However I did do a lot of research and knew what look I wanted to achieve with the planting and that I wanted everything to be evergreen - I find no leaves for the cold months thoroughly depressing.
I wanted a mix of wild and manicured, which will hopefully come into its own in the next few years. I knew I definitely wanted lollipop bay trees, buxus balls (despite MANY warnings about blight, I decided to go for in anyway - so far, so good), which was born from my ever growing topiary obsession and many lockdown walks to visit the local topiary, much to the kids dismay! I wanted rosemary, lavender, jasmine and grasses. Lots of grasses. And down the side where there is less light, ferns.
Emily Hillier helped me to make my final decisions and threw in some brilliant extra suggestions that I’d never have thought of, including adding heather and verbena in to the mix, and mixing more grass in with ferns down the side.
I would never have known how much to buy and of what, so I am super grateful to her for helping me out. She designs the most incredible gardens so do give her a shout if you’re in need of a garden designer!

the day the plants arrived was the best day ever. I was beside myself with excitement
I was going to go through all the planting here, but this post is already too wordy, so I’m going to do another blog post just about that next week.
Oh, I almost forgot to mention the grass! The grass was the final thing that went in and although it was really the planting that brought the whole space to life, it was the grass that connected all the dots and finished it off. We bought it from Grass247 and it’s called Balcombe Vale. I think we needed 8m (its a 4m width) and just have two small joins. It seems really strange when it first goes in, but once it settles it’s honestly brilliant. This definitely wasn’t the cheapest one available, but it was the cheapest most realistic one that we liked and it’s thick and has shorter bits within the pile to stop it going too flat. We still need to top dress it with Silica sand in the spring. Another thing on the list!

Clockwise from top left: The giant roll of grass arrives / Final Grass Choice / Shock pad Grass Underlay / Rolling up the old grass. A monumental moment!
We always knew we would go for artificial grass again, having had such a positive experience with our much smaller patch last time, and I honestly can’t sing the praises of it enough. I know some people have an issue with it from an environmental perspective, and I can’t really justify that and I’m sure it’s not recyclable (although we did give our old grass to a follower who instantly installed it in their own garden!), BUT the fact that it’s zero maintenance, looks perfect all year ‘round, doesn’t need mowing and isn’t just a big mud bath, for us far outweighs any negatives. It’s basically outdoor carpet and I would a hundred percent do it again.

Full roll of grass rolled out ready for installation / cutting the curved edges for the garden bed
But I have a confession to make. I think we used our final bit of mental energy to install it to the point we have, and we still haven’t actually finished the installation. It needs to be glued down around the edges, the joins actually stuck together, and as mentioned above, top dressed with silica sand. That said, it’s such a huge weighty piece - I don’t know how the two of us managed to get it through the house and into the garden as it quite literally weighs a tonne, so it’s not going anywhere, but we do need to sort that all out in the spring.
One thing that had to give from the original plan, was the addition of a black metal pergola over the back patio. This is still something I really want to do, although as always, nothing is ever straight forward, and as the back wall is on an angle, the off the shelf one I wanted would have to be altered to work. So we will see come Spring if that’s something I want to tackle, but it just got put in the too hard basket last year.

TESTING OUT THE SOFAS ON THE GRASSED AREA
So we will be busy with this list of jobs to finish everything off, but we have come SO far, and I still look out there every day and can’t believe that after so many years of hating our garden, that it’s actually ours. And not only that, but aside from the electrics we did literally all of it ourselves.
